March 29, 2014

Another quilt back from scraps


I had quite a few scraps of patterned fabric left over when I finished the quilt I made from Carolyn Friedlander's "Focal" pattern.  Rather than re-sorting them into my scrap bins, or just discarding them, I decided to piece them together, along with some hand-dyed scraps, making some blocks that I would use in some fashion for the back of the quilt.  Preliminary sections are in the pile above.  Below, I've sorted some out into blocks, next to the finished top.


Not sure yet where I'll go from here.  I could separate blocks with solid fabric, or I could piece everything together.  (And if I love what I come up with, I'll change it to a top rather than a back.)  I've got all the scraps sewn into units with at least three or four pieces.  Now I have to put this aside for a while, as I need to prepare for a retreat I'm going to in 10 days, including a couple of new idea-based projects that need some extended thinking and sketching/planning.

Guest post on Techniques, Tools, & Materials for Hand-Stitching

I recently posted my last guest post on the blog ". . . And Then We Set It on Fire".  You can see it here.
http://andthenwesetitonfire.blogspot.com/2014/03/techniques-tools-materials.html  I've also posted it below.

* * * * * * *

Penny Gold again here, with my last guest post.  Many thanks to Beata and the other guest bloggers for all of this month's posts!

I know I appreciate hearing about specific techniques, tools, and materials used by others, so I thought I'd share some of my own favorites here.

TECHNIQUES:
Stitching without a hoop or frame:  Learning to quilt without a hoop or frame made a big difference to me.  I like hand-stitching to be portable, so didn't want to be tied to a frame, and even a hoop is awkward to carry around.  I learning the method I now use from Suzanne Marshall.  I have not seen it described in her books, which focus on applique, but this Youtube video shows the method I learned from her.  The key thing is that most of the movement is in your left hand, moving the fabric up and down, rather than in your right hand that holds the needle (reverse for lefties).  One key thing that the video doesn't show:  When stitching in the center of a larger work, with too much fabric to gather in your hand and still keep your thumb on top of the work, you can move your left hand underneath the work and grab a kind of pocket of the fabric near where you're stitching.  You can see a photo of what I mean here (Suzanne Marshall) and here (Tonya Ricucci).

Stitching in limited stints:  For the first few years that I was doing hand-quilting and hand applique, I would stitch for an hour or more at a time.  I started developing hand pain, then numbness, and also a ganglion cyst on my wrist.  I was reassured that the cyst was not dangerous, just ugly, and I could live with that, but the pain and numbness were troubling.  I learned a number of hand and wrist exercises through physical therapy, and that helped a great deal.  But I was also instructed to stitch for shorter stretches of time.  It was hard to cut back, but I knew that keeping hand function was important!  So, I started timing my stints of handwork to the length of one side of an LP record, treating myself to listening to some old albums while I sewed.  I continue to limit myself to about 20 minutes of hand-sewing a day.  It is a little island of quiet for me.  The work goes slowly, but it progresses steadily.  I have accepted the slow pace, knowing that the work still will eventually be complete.  Here's a link to a substantial piece on hand health for stitchers.  It focuses on arthritis and carpal tunnel syndrome; my issue was repetitive strain injury.

Threading multiple needles at once:  The part I like least in hand-sewing is having to thread the needle time and again.  I find this annoys me less if I get multiple needles lined up with thread at the end of a session, so I'm all set to go when I sit down to sew.  This also serves as another way for me to time a limited stint--sewing 6 needles is, for me, about 20 minutes.

TOOLS & MATERIALS (needles & thread):
When handquilting with thin quilting thread, I've used a size 8 or 9 between needle, with most any make satisfactory.  But I've had more trouble finding a needle I like for doing bigger stitching, with heavier thread or multiple strands of thread.  I like a needle thin enough to go through the fabric easily, with a big enough eye that I can thread it without a needle-threader, and a comfortable length (not too long).   The two brands/size of needles detailed below fit all three criteria when I'm using DMC embroidery floss, up to three strands.  In my current project, I'm using one strand of 20/2 pearl cotton from Halcyon yarns, recommended to me by a weaving friend as a thread that dyes well (as I was dyeing thread to match the fabric).  The roundness of this thread (as opposed to embroidery thread, which seems flat) prevents it from easily going through the eye of the needle, so I've reconciled myself to using a needle threader with this thread.  I did try a needle with a larger eye, but since the whole needle was larger, it was a lot more difficult to push through the fabric.

Mary Arden Embroidery needles--in a packet of assorted needles ranging from size 5 to 10, there seem to be three sizes.  I use the middle size.  I bought them at Colonial Needle.
John James Embroidery needles in a dusky pink "pebble."  I also use the middle size needle in this pack.

I would be very interested to hear about what type of needle you prefer to use--please leave a comment (or e-mail me directly) if you have one you like!

And here's Beth Berman's great tutorial on dyeing thread, including how to make up the skeins from a larger ball/cone of thread, and how to take individual threads off the dyed skein.

March 28, 2014

Adapting Carolyn Friendlander's pattern "Focal"


I really enjoyed sewing this version of Carolyn Friedlander's quilt pattern "Focal"--my version above and hers below, and a link to the pattern here :


I made several changes in the pattern beyond the obvious one of colors (though I like her colors very much).  I arranged the spikey bits to edge up on the center--I like the contrast there, and didn't want to lose any triangles in the binding.  I used my own hand-dyed fabric rather than commercial; I wanted a bit of movement in the central piece, which I get from the mottling in the hand-dye.  I arranged the corners differently--a by-product of sewing on the first border all around, without thinking of the consequences.  But the main difference is not so visible:  instead of paper-piecing the border, as called for in the pattern, I did only two 10" segments with paper-piecing, and then switched to improvisationally cutting and sewing the small pieces for the border.  I know some people really like paper-piecing (involves sewing fabric upside down onto paper printed with the pattern), but I'm not one of them, so I was really glad that a different method worked.  Here are a few photos of the process.

The top row shows about 8 different colors, cut 2-1/2 x 6", for the "stick" part of each border piece.  In two rows below that are smaller scraps of patterned fabric.  Bottom right are four orange sticks lined up with scraps that will become the corner triangles.  My favorite part of the process--choosing scraps for the corners, looking for an array (doing 3 or 4 sticks at a time) that would be interesting together, and also contrast with the stick.  I do love playing with color. . .


Some scraps were sewn to the left side of the stick, others to the right.


After scraps were sewn on and the flap ironed out (pile on bottom left), I squared up the stick (under the ruler, bottom right).  Top left is the finished sticks plus triangles.  Top right is the cut-offs from the scraps.


Photo below shows audition of sections for the second border, before all were trimmed.


Checking values with a black/white photo.


Finished top again (for true colors, see details below)

 Details from the borders


Now I have to piece a back, and figure out how I want to quilt it.

March 27, 2014

Expanding a palette


A recent project demonstrated clearly to me how expanding a palette can make a more interesting quilt.  I recently got a ruler that makes it easy to cut isoceles triangles, and wanted to make a quilt with just the one shape.  I opened my drawer of hand-dyed fabrics, and picked out a few colors I had done this summer and was really happy with the limited palette I pulled--mauves, lavender, blues, and greens. 

 My first layout:


I liked these colors, but they seemed a little boring. 

I tried adding in light blue to get larger range of values:


Then I added black and cream:


I took out the black and cream, and added in yellow and orange--better!


Finished front of quilt:


Cutting the triangles left me with a lot of beautiful scraps.  I pieced them together together, intending to use them for the back of the quilt:


After adding in some additional large pieces of my hand-dyed fabric, I decided this deserved to be the front of another quilt.  


For the outer edge, I used a "faux-piped binding technique:


I made two "chunky log cabins" to be the backs for the two quilts.  I enjoyed making these, working with the large supply of commercial solids that I have in my stash.  But in making backs larger than the fronts (as one does to help in the sandwiching/quilting process), I didn't take well enough into account the finished size of the back.  Top and bottom edges are fine, but the intention was to have wider pieces on the right and left sides of both backs:


March 15, 2014

Two posts on hand-stitching

I'm one of several guest-bloggers this month on the blog "And Then We Set It On Fire."  The theme of the month is "Hand-Stitching," with Beata Keller-Kerchner taking the lead and choosing the guests. An honor for me to be included!

My two posts so far are "Bringing Stitching Forward," which talks about the influence on my work of taking a drawing class, and "Letting Go," which shows how a workshop with Dorothy Caldwell brought that influence to the arena of stitching.  Some of the photos will look familiar to you from earlier posts on my blog, but I've added more in these posts, and the reflections are new.  (I've also copied the two posts below.)

If you're interested in hand-stitching, I highly recommend that you go back to March 1, 2014 on the blog--when Beata started the month with several posts--to read what she and others have been writing about.  It's not the easiest thing to go backwards in blogs.  I recommend you go to the main link for the blog And Then We Set It On Fire, and then scroll all the way down to the beginning of the month (which will likely involve going to the bottom and then clicking on "Older posts."  When you find March 1, you can then read from there.

Beata's work is inspiring--do check out her blog/website.

* * *
BRINGING STITCHING FORWARD
My attention in quiltmaking has long been focused on color and shape.  Choosing fabrics, creating pleasing adjacencies of color, selecting shapes--these have been my main pleasures.  Quilting the layers together at the end was often done with reluctance--I loved how the tops looked without quilting.  I thought about changing to doing fabric collage rather than quilts, but I love the feel and drape of quilts, and I enjoy giving quilts to family and friends as gifts that can be used.  And--I had to admit--the finished quilted product always did look better than the unquilted top. 

I have always done some handquilting (reserved for projects that had special personal meaning) as well as machine quilting.  Whether working by hand or machine, I found it difficult to think creatively about the stitching; my main question was: what stitching would detract/divert the least from the design I had made through color and shape.  Several years ago, I decided to challenge myself to think in a more wide-ranging way about the quilting, to think of the quilting as a kind of drawing, as a layer that could add additional meaning to a quilt rather than just supporting what was already there.  I had the good fortune to be able to take an art class at the college where I was teaching, a course called "Drawing in the Expanded Field."  The course was about a wide range of 20th-century and contemporary drawing, considering "drawing" in the widest possible sense.  I looked at artists familiar to me in a new light and learned about many more; favorites include Sol LewittAgnes MartinGego and Eva Hesse I did a lot of experimental drawing.   I learned a great deal, with two things in particular that have an impact on my work in quilting:

1) I love repetition of simple lines and shapes.  This is obvious from my attraction to the artists mentioned above.  Variation is also a necessary part of the work—but sometimes only the very slight variation that comes from something being repeated by a human hand.  There is an obvious connection here to the pleasure I get from traditional hand quilting—one similar stitch after another—and from my favorite style of machine quilting, which is closely spaced parallel lines.  There is a kind of control and attentiveness in these processes that appeals to me.

2) But—more of a surprise to me--I also learned that abandoning control can also yield interesting and pleasing results.  I'll talk about two examples.

Using a code to generate a sequence of shapes:
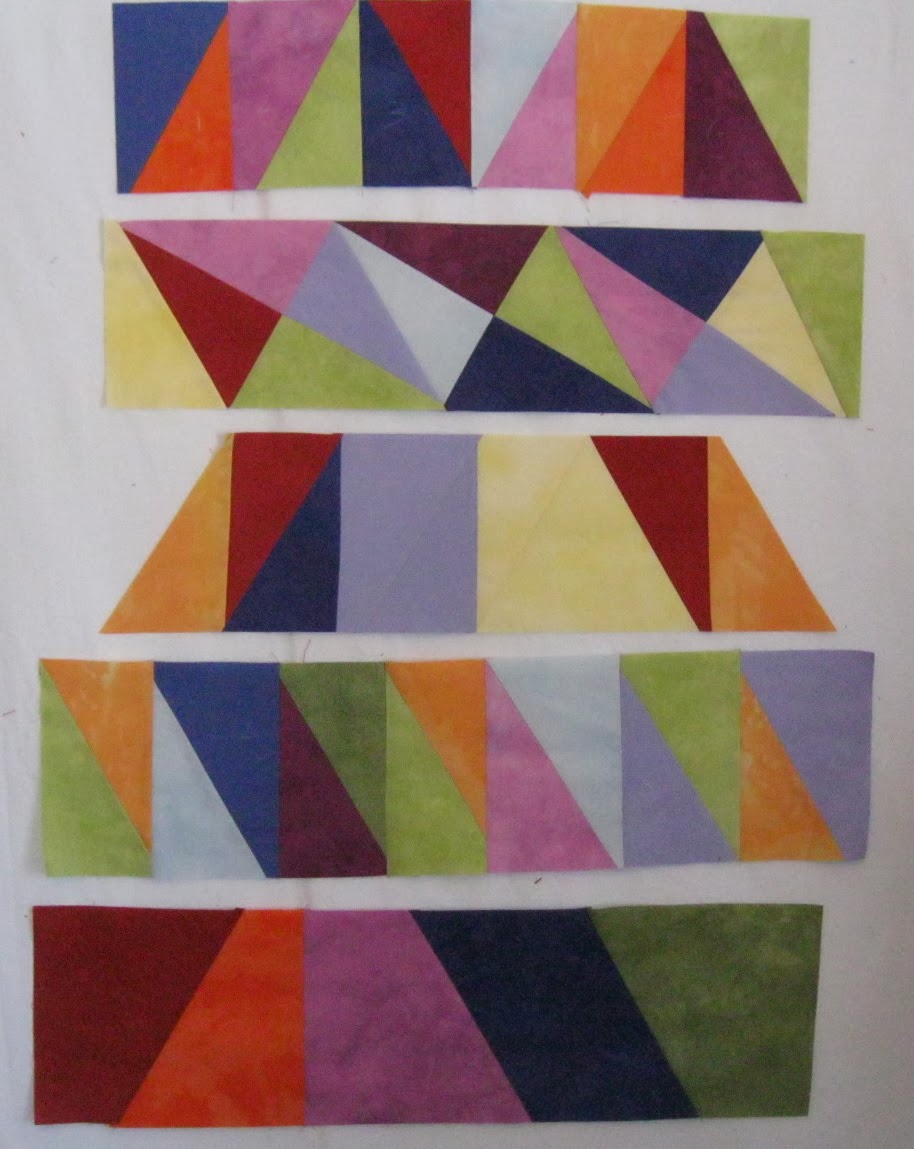
One exercise in the class was to find a pre-existing pattern or code, and to use that to generate a sequence of some sort in one's art work.  The pre-existing pattern I used was a sentence taken from a book I happened to have open.  Then, following the sequence of consonants and vowels, I assigned vowels to be squares and consonants to be rectangles:


I loved making this and others like it, fiddling with various shapes and assigned codes.  It freed me from making decisions about placement of each shape—I just followed the code.  Yet, because there was some underlying meaning/rule in the originating code (the relationship between consonants and vowels in English words), the resulting pattern of shapes had a kind of in-built balance to it.  I enjoyed the combination of freedom with structure.

Cutting things up and re-structuring:
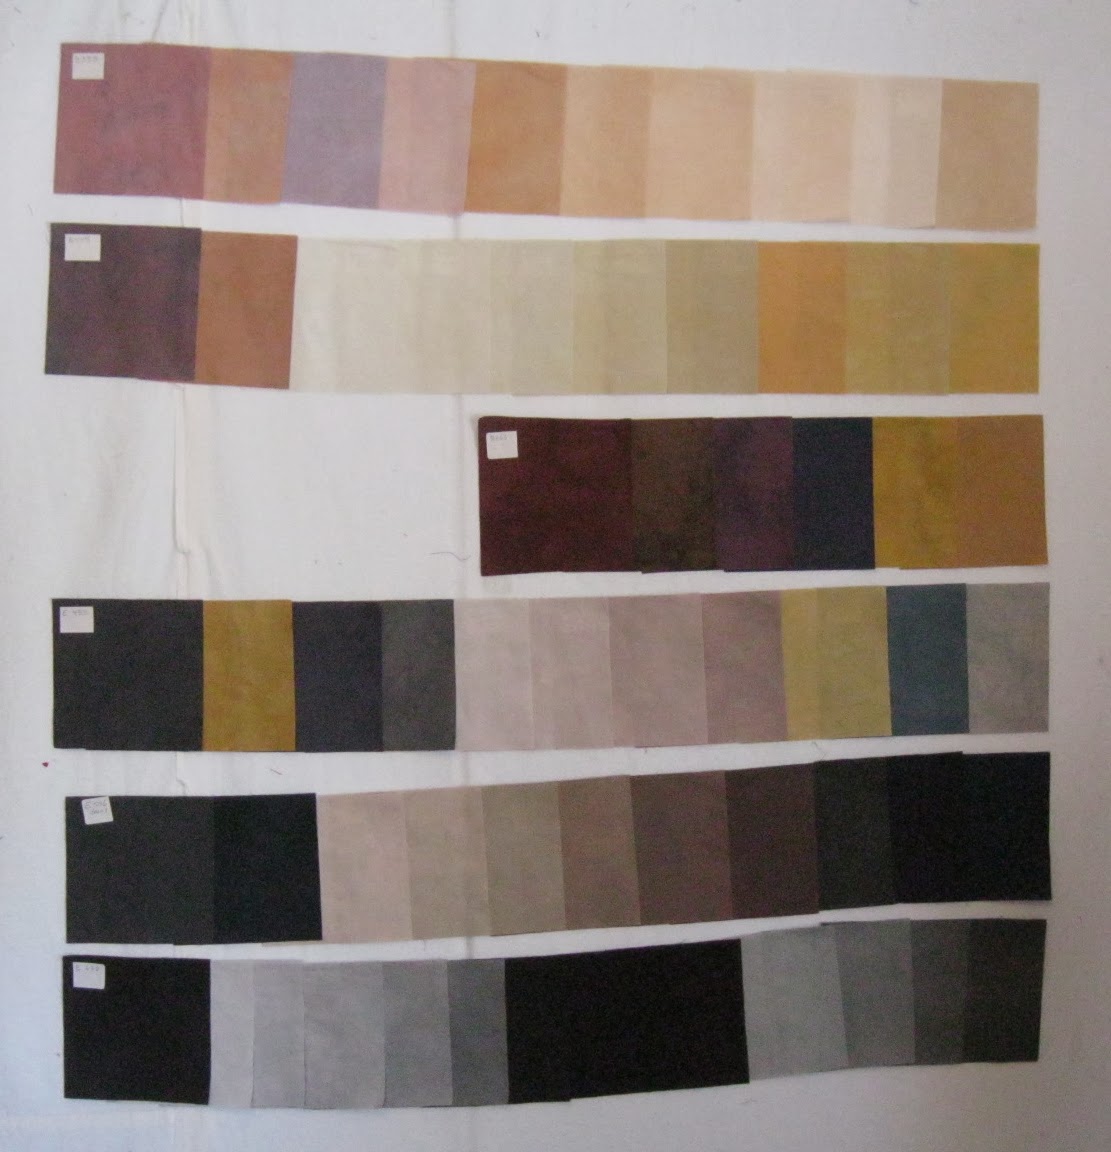
One of my ongoing quilt projects has to do with stones, some pieces focused on color, others on shape.  For the ones focused on shape, I was intent to convey the beauty of the myriad curving contours of stones, so I put those curves against a contrasting background, for example, these small pieces made with hand-painted fabric: 


One of the class assignments was to cut up something and then make something from the pieces.  I photocopied a number of photographs of stones, cut up the photocopies, and collaged them together.  Here's one of the resulting collages, perhaps my favorite piece from this class:


and a detail:


I made straight-edge cuts, and I like how those straight edges play against the curved lines of the stones.  This is nothing like the fabric work I had done before, and I never would have gotten here through step-by-step figuring out.  It took the leap of cutting up, itself done randomly, without intentionally trying to make particular shapes (other than angular edges).

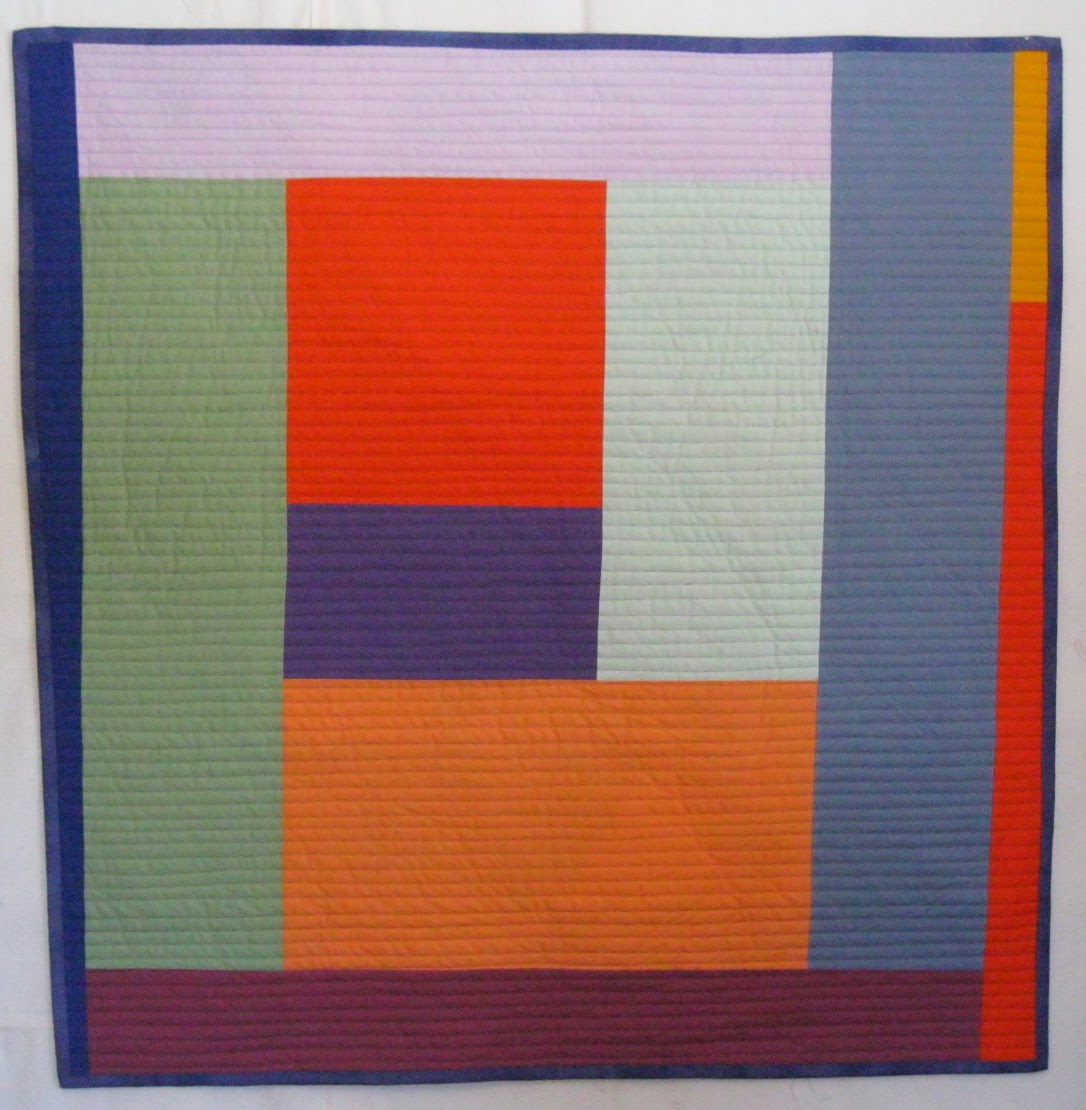
Buoyed with courage from that experiment, I took the leap, and cut up some fabric stone shapes that I had appliquéd onto fabric, and then put them back together in a new composition:


I do love this small piece (13x14").  But still, what to do about quilting?  Once again, I couldn't bear to "interfere" with the shapes, and I kept stitching to an absolute minimum, invisible except from the back.

So, the class taught me a lot about what could be gained by experimenting, and most especially, by letting go of control and of conscious intention.   But the impact in my quilt-making ended up being in the areas of color and shape, not in the line of quilting.  Yet the groundwork was laid, and when I read a description of Dorothy Caldwell's "Human Marks" workshop, I saw this as a chance to come back to thinking about quilting as drawing, as "mark-making."  My next post will talk about the impact of that workshop on my stitching.

* * * *

LETTING GO
As I talked about in my last post, the drawing class I took several years ago taught me that letting go of control could yield interesting and beautiful results.  But even though I went to the class with the intention of applying it to stitching, nothing much happened on that side of things.  I knew I wanted to do something different, but had no idea of how to go about it.  Then came Dorothy Caldwell's "Human Marks" workshop in May 2013, which opened up a whole new arena in stitching for me.  I have written about the week at the workshop and about work influenced by it in my own blog.  Some of the photos below also appear in that post, but have added new reflections here, focusing on the notion of "letting go."

A number of the exercises in the workshop were directed towards opening oneself up to chance or accident, encouraging us to pay attention to what was happening under our fingers, even if it wasn't intentional.  Here are two new directions in my stitching, both stemming directly from the workshop.

Blind stitching

The photo below shows the results of a blind stitching exercise, where Dorothy would read out a word, and the students, blindfolded, were to make a row of stitches with that word in mind.


When I took off my blindfold, I was enthralled with the second row from the top, made with the word "dialogue" as the prompt.  (I intended pairs of stitches, but sometimes I couldn't remember whether I'd done one stitch or two, so sometimes ended up with three stitches together.)  I asked Dorothy, "If I want to do a stitch like this again, do I have to be blindfolded?"  She answered no, likely not--a good thing, as sewing with a blind-fold on was not something I'd be eager to incorporate into my practice. Looking at the work as it develops is one of the joys of hand-sewing.

Last fall, I tried out the stitch as one included in a sampler piece (more on this piece here):


It is not as "loose" as the stitch done blindly, but that's fine--I like it very much as it is, perhaps even more than the stitch done in the workshop.  I think of it as my "conversation" stitch.

Looking at the back
One of the major lessons I took away from the workshop was reinforcement of the idea to slow down and look carefully.  To be open to accidental beauty.  To look for serendipitous adjacencies/relationships (this last most in play when we were making our small books, looking to arrange pages with interesting juxtapositions).  For example, on one of my cloth-book pages, I sewed a trapezoidal piece of fabric I had brought with me.


But when I turned the page, I found I was more enchanted with the line of stitches that showed on the back:


Looking at the back came into play when I turned to a large quilt that had been lined up for machine quilting for some months, but I had been unable to make a decision about the quilting.  It struck me that  my "conversation" stitch--could contribute to the meaning of the quilt, which is about regret--a state of mind that has much to do with conversations, missing or gone astray.  And that sitting with the quilt on my lap for the months it would take to hand-quilt it would be more therapeutic for me than machine stitching.  (More on this quilt here.)   I started by making the stitch in irregular rows in the upper right black figure (charcoal thread on black fabric).  When I looked at the back, I loved the irregular dot-dash lines that were created, and decided to use that as the main stitch on the rusty/red/orange background sections of the quilt.  So, for those sections, I am stitching with the back of the quilt facing up, making the conversation stitch onto the back.  In this photo, you can see the conversation stitch in the black and it's "back" in the background (this shows about a quarter of the whole quilt):


Here's the back side, showing stitching from the top right and some background:


And I've also varied the stitching on the front by sometimes doing the stitching from the back as a random seed stitch rather than in rows, which yields the stitches on the bottom right on the red side.  (This is a lot less confusing if seen in person!)


When my friend Mary Beth was visiting a few months ago, she asked me how it felt to do the more improvisational stitching--did it take more attention/thought than a standard, regular quilting stitch, or less?  Interesting--it actually takes more, and I find this to be true of making compositions improvisationally as well.  There is an early stage when the point is not to think so much, to let go of concentrated intentionality.  This is what generates the free-form stitches or compositions.  But once those elements are in place, and one wants to repeat them or work them into a composition, one has to think about it.  In repeating the conversation stitch, I had to take care to make it not regular.  After months of repeating the stitch, it now comes pretty naturally to vary it without thinking.  But there is still more conscious thought involved.  It's different from the kind of meditative state that I am more likely to enter if doing a regular, repetitive traditional hand-quilting stitch.  I like both.

My last post is scheduled for later this month.  In that post, I'll talk about techniques, tools, and materials (including the thread that I hand-dyed for this last project).

March 7, 2014

Dyeing Neutrals


I've made several small quilts in which I've tried to capture one or more elements of stones--color, texture, shape--and plan to do more.  I've done some of this work with hand-painted fabric--easy to get the colors and patterning I want, but the paint changes the hand of the fabric in a way I don't like.  Hand-dyed fabric would be better on that score, and I've been dyeing neutrals from time to time to build up my supply.  Some months ago,  I learned that Carol Soderlund would be doing a workshop at the Crow Barn specifically on Neutral Territory: 50 Shades of Gray and 50 Shades of Brown, but by the time I decided to sign up, the class was already full.  It will be offered again in 2015, but rather than wait until then, I decided to invest a few weeks of steady dyeing time to come up with neutrals tailored to the projects I have in mind.  (In addition to the stones project, I am also in the early stages of a project that has to do with trees, so I need some grayish/browns for that.)  I spent a few weeks in December and January dyeing about 50 different colors--some done individually, some done as gradations of one hue.  The photo above shows the resulting collection of neutrals (including some pieces that I'd done before).

I've kept samples of my hand-dyed fabric before, but not in a systematic enough way to easily find a particular color that I may have dyed before.  I wanted to be able to easily reference the neutrals, so I came up with a filing system.  With each fat quarter (18x22") that I had dyed, I cut off a 5-1/2" strip, and then cut three 5-1/2" squares from that strip.  (I like having large samples, especially because there is some mottling in this fabric.)  I folded up the remaining large piece for the drawer (shown above).  Below is one set of squares.  (For those who have had a class from Carol, the first three rows are from the "Basic" family and the bottom three rows are from "Earth.")


Each square and the larger piece are labeled with the numerical code for that color.  I then filed the squares in three ways:

COLOR:  Little "file folders" (made from envelopes) for gray, tan, and brown:

GRADATIONS:  In this section, I have a separate folder for each color on which I did a gradation (anywhere from four to six steps down from the original color).

An example of a 4-step gradation of one color:

FAMILY:  This is a master section where I can look up a color by its family (Basic or Earth) and its numerical code.

Hey, all those years of academic life spent organizing information have had a payoff in this arena too!

Further details on the dyeing process for the dyers among my readers:  All the samples I did in this last push were done with LWI (low water immersion).  This is not as effective for getting solids as full immersion (the method Carol uses when students create their sample books), and the results are not as reliably repeatable, but it is a much easier method for working on one's own, and it's the method I use the most in my own dyeing practice, so I thought it best to make my samples with LWI as well.  I also like the gentle mottling that one gets in LWI.  Part of Carol's Color Mixing for Dyers I class is also devoted to LWI--highly recommended!
  
On the issue of how many pieces of fabric can be processed at once?  When I have a lot of different fabrics/colors to dye, I find that I can do five containers at once, each holding anywhere from a 1/4 yd to a full yard of fabric.  I squirt the dye on the first piece, massage for a while, then move on to the next. When I get to the end of the row, I go back to the first.  To get a near-solid, I keep going for about 15 minutes, which takes me through the line three or four times.