A few months ago, I wrote a post about the reception of my quilt "Self-Portrait, Year 2: Beneath the Surface" at QuiltCon. I also received two requests for interviews, which are now being published. The first out is an interview by Bill Volckening in Why Quilts Matter. The interview is long, so it has been divided in two parts. You can read Part 1 here. Part 2 will be published in June: now available here.
I am honored and humbled that Bill found my quilt and its story worthy of an interview. Bill is a distinguished collector of quilts and writes extensively about quilts on his blog and on Facebook--do check out his website: http://www.billvolckening.com/
Thank you Bill!
May 19, 2015
May 18, 2015
A small dyeing interlude
In the midst of a long, slow process of doing trials on a large work in progress, I took some time out to dye a couple of T-shirts, one for myself, and one for a young friend. First I dyed both shirts turquoise, then in a second step added pattern with black. The patterning on the first shirt was done by loosely folding the dyed shirt diagonally, and then dripping black dye over the folds.
 And here's the shirt I made for myself, in a different process that I was trying out for the first time. I like how it came out!

Here's the set up (photo below): I tipped a print board (foam insulation board, covered with fabric, and then a sheet of plastic) by resting it against a box of books, with the bottom edge draining into the blue lid of a large storage box. I pinned the bottom edge of the turquoise shirt to the top edge of the board, scrunching the shirt into vertical folds. (The shirt is wet at this point, so the folds hold.) Then with a bottle of black dye, I squeezed on some dye, working from the top of the board (the bottom edge of the shirt), aiming to have the bottom edge mostly black, but leaving the neckline turquoise. The photo shows the shirt about 12 hours after the application of dye (time needed for the dye to batch). If I had taken a photo immediately after the application of the dye, you would see that the dye travelled quite a way down the shirt after the application, something I hadn't taken into account--I was thinking more turquoise would be left at the top. But I do like how it came out, so no problem.


Improv Log Cabin workshop
I'll be teaching an improv workshop at my local quilt guild, Piecemakers (Galesburg, IL), on August 22. The workshop is designed for quilters who are new to improvisational quilting, but those with experience are most welcome also; we'll focus on versions of the Log Cabin block. Most of the time will be taken up with experimenting with different making a variety of blocks, but I thought people might like to have directions for a small project they could make with as few as four 6" blocks. So I made several tablerunners, illustrating different fabric, setting, and quilting choices. In the chartreuse one (below left), I used all solids, with a background of one color related to (but not in) the blocks, quilted with a 1" grid, and bound with a contrasting fabric. In the blue one, I used print fabrics, a narrower blue/orange color scheme, I framed each block to set them off from the background, quilted in an overall free-motion design, and bound with fabric close in color to the background. (Double-click on photo for a closer view.)

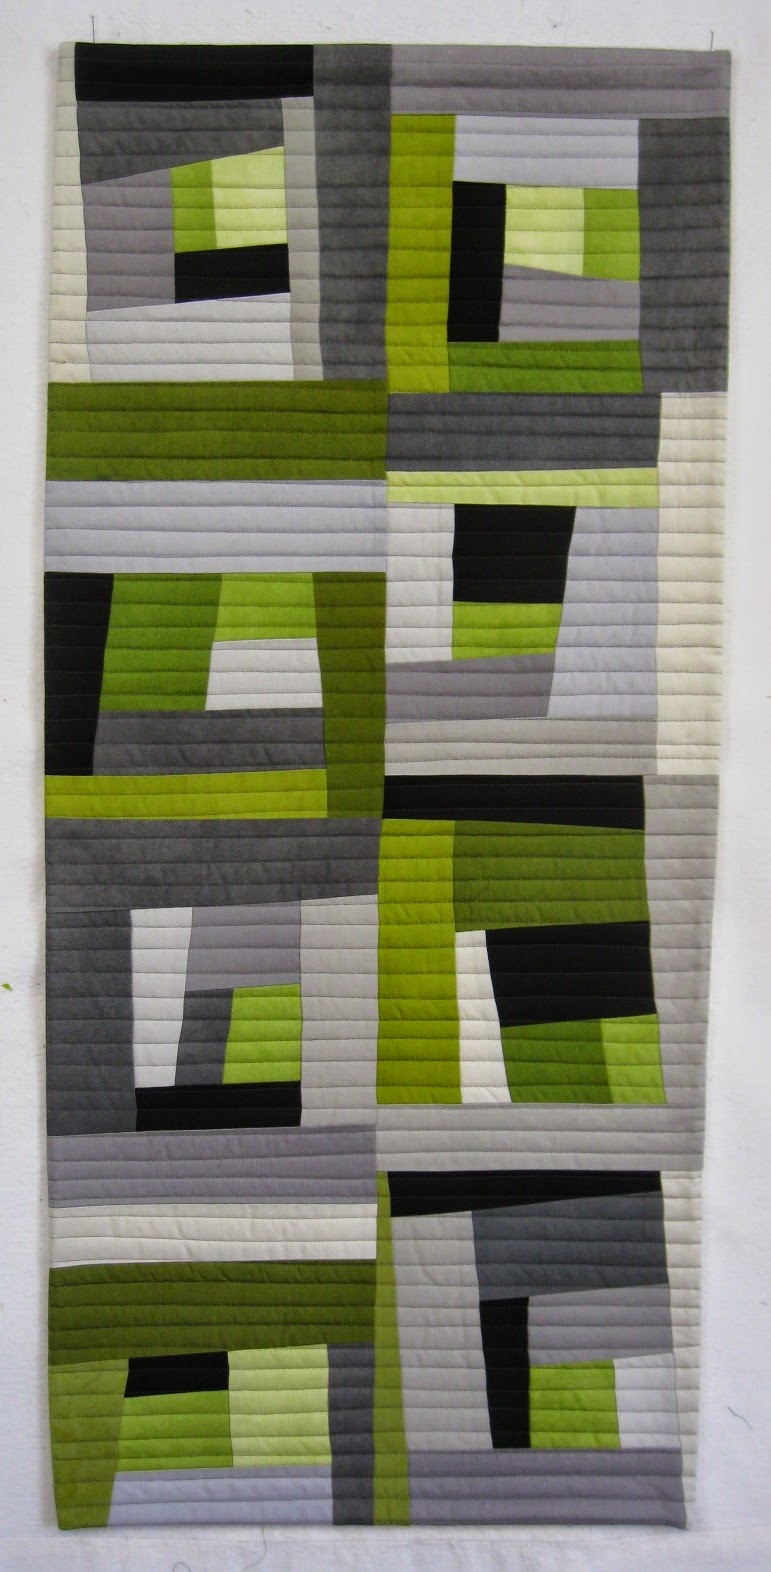
Then I made a third runner with larger blocks and no background. I love this color scheme of green and gray, (a combination I saw in a quilt by Erin Wilson in a show in NYC last fall--can't find a photo on the web). This one I quilted with straight lines, and did a faced binding (so no binding shows on the front):

Then I thought I'd try one more using a combination of patterned and solid fabric, blocks sewn together, but with a frame and border. This one I don't like very much, so I didn't bother to continue with quilting it. Maybe I'll do a giveaway of it at the workshop, if a few people are interested.


Then I made a third runner with larger blocks and no background. I love this color scheme of green and gray, (a combination I saw in a quilt by Erin Wilson in a show in NYC last fall--can't find a photo on the web). This one I quilted with straight lines, and did a faced binding (so no binding shows on the front):
Then I thought I'd try one more using a combination of patterned and solid fabric, blocks sewn together, but with a frame and border. This one I don't like very much, so I didn't bother to continue with quilting it. Maybe I'll do a giveaway of it at the workshop, if a few people are interested.

May 11, 2015
Wild Geese: Improvisational quilting with Sherri Lynn Woods

I'm delighted to be a stop on the blog tour for Sherri Lynn Wood's new book, The Improv Handbook for Modern Quilters. I was one of the quilters who volunteered to follow an improv "score" assigned by Sherri, so that she could illustrate the range of quilts that could result from the same underlying guidelines. 165 quilts were submitted and 22 accepted; I'm delighted that mine made it in! In this post, I'll describe the process through which I came to the final composition, talk about what I learned through the process, review Sherri's book, and, last but not least, offer a giveaway of the book to a lucky reader.
The score that I was assigned is called "Modern Block Improv." The basic idea of this score is to take a traditional block--here Flying Geese--and to work with it improvisationally. My finished quilt:
"Wild Geese" (38 x 40")

I had taken a class from Sherri at QuiltCon in 2013, and the class had focused on the same idea of starting from a traditional block. In that case, we had been asked to come to the class having chosen a block that we wanted to work with. I had chosen "Rail Fence," and really enjoyed the process of discovering totally new directions from the focused improvisation. You can see posts on the workshop and later work based on that here, here, and here.
For the flying geese project, I began by trying out a number of variations on the block. I found doing improv with triangles quite a bit more challenging than the rectangles I'd used before (in working with Rail Fence, and also Log Cabin)--but that also meant some interesting surprises. The photo below shows the earliest versions at the top (two normal flying geese blocks, but cut by eye rather than by measuring), and the later versions below that. I was glad I tried out a variation with curved "triangles," but they didn't end up in the quilt. One side effect of improv piecing--quite a few experimental blocks end up in the scrap bin.

After I had a stock of blocks, I played around with juxtaposing them. Really interesting shapes can develop.

I find making the array of blocks, trying out one thing after another, to be a very playful activity; the really hard work comes when trying to put the blocks together into a composition. Without a set pattern to follow, there are so many possibilities. I found it important to continually and consciously keep design principles in
mind as I moved the blocks around the design wall--e.g., line, shape, color, balance, asymmetry. (Value and texture didn't come into play here, because of my decision early on to use only red and white.)
The traditional flying geese block lends itself to be organized in rows, either in a border or in the whole quilt. I wanted to reference that traditional layout in my quilt, but not to make it the central design feature. In this first pass at making a composition, I put a row of traditional blocks in a column on the left side of the quilt, and some version of that stayed through to the end.

It bothered me that I could see a cat's face in the composition: two white ears and a chin. Improved by taking out the "chin" and simplifying the center of the quilt:

Better yet--I like the addition of more red, including reversing the colors of the flying geese blocks in the bottom left:

The version above was sandwiched, and I was about to start the quilting the finished top. But the two large vertical triangles that had previously bothered me as "ears," now bothered me as "mountains." The human mind sometimes fights against abstraction! Rather than undo a lot of the piecing and trying to insert new sections, I decided to use applique to change that area of the design by sewing other pieces of fabric over the composition. It worked--once the quilt was quilted, even I can't find the spots that were appliqued unless I compare the photos. The final composition:

Deciding on the quilting was another challenge. I wanted to quilt white on white and red on red, which meant a lot of starting and stopping as I sewed. I also wanted to change quilting designs in the various areas of the quilt. I tried out a number of designs with pencil and paper, many of which were included in the quilt:


I love how the back of the quilt has it's own design, as a result of the red quilting showing through on the white back:

I definitely recommend Sherri Lynn Wood's book to anyone who is interested in improvisational quilting, either trying it out for the first time, or looking to extend the ways in which you already use improvisation. Take a "look inside" on its Amazon to see the table of contents and sample pages. One of the main sections of the book are the ten quilt Scores, which will guide you through a variety of strategies for improvisation, and another main section is on "Patchwork Techniques" that are used in one or more of the scores, techniques that are helpful no matter how you incorporate improvisation into your quilting. I'm looking forward to trying out more of the scores, starting with Patchwork Doodle, Layered Curve, and Showing Up.
It bothered me that I could see a cat's face in the composition: two white ears and a chin. Improved by taking out the "chin" and simplifying the center of the quilt:
Better yet--I like the addition of more red, including reversing the colors of the flying geese blocks in the bottom left:
The version above was sandwiched, and I was about to start the quilting the finished top. But the two large vertical triangles that had previously bothered me as "ears," now bothered me as "mountains." The human mind sometimes fights against abstraction! Rather than undo a lot of the piecing and trying to insert new sections, I decided to use applique to change that area of the design by sewing other pieces of fabric over the composition. It worked--once the quilt was quilted, even I can't find the spots that were appliqued unless I compare the photos. The final composition:
I love how the back of the quilt has it's own design, as a result of the red quilting showing through on the white back:

May 4, 2015
"Plain Spoken" now on the bed

Today I finished this quilt, begun about a year and a half ago. It's a version of a pattern by Weeks Ringle and Bill Kerr, "Plain Spoken," published in their book, Modern Quilt Workshop; the fabric is Kaffe Fassett shot cotton. I've written several earlier posts about the quilt, so if you'd like to read about the quilt in process, you can find those posts here.

I've been working on the hand-quilting since last July; it has been nice to start each day with a half-hour or so of this quilt on my lap.

Backing and binding are hand-dyed fabric.
Subscribe to:
Posts (Atom)
